Pod
A Pod is the most fundamental deployment unit in Kubernetes.
The Master Node delivers Pods to Worker Nodes, and Worker Nodes execute them.
You can think of a Pod as the smallest unit deployed within a cluster, encapsulating one or more containers.
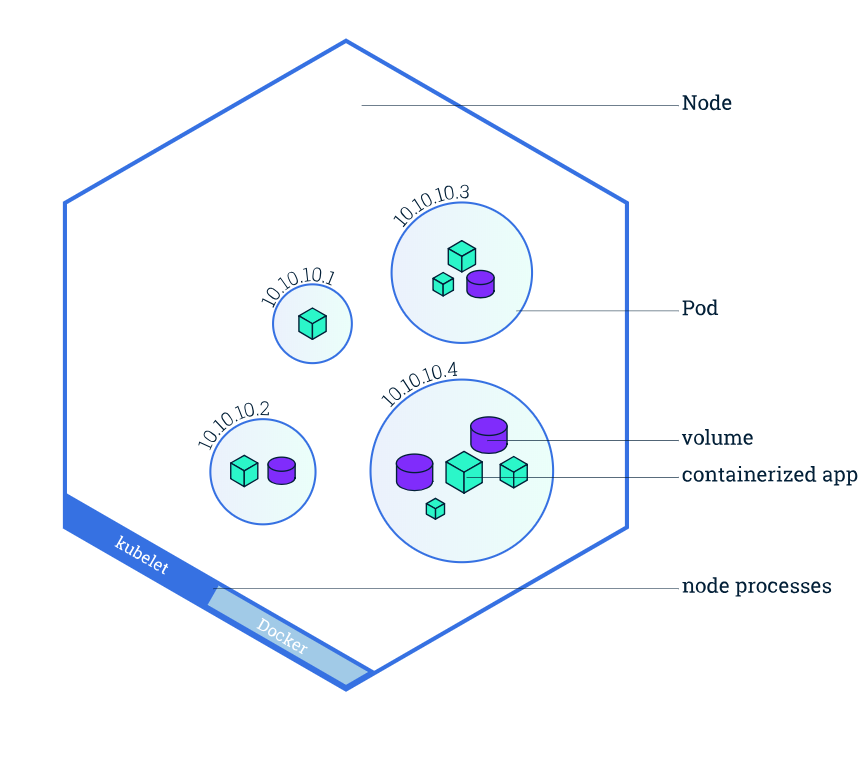
Pods have the following characteristics:
- A single Pod fundamentally contains one or more containers. Multiple containers can be included as needed.
- A Pod is assigned a unique IP address separate from the Node's IP, which is shared by the containers within the Pod.
- A Pod itself can generally only have one IP address (though it can have two under specific conditions, such as when using Multus CNI).
- Containers within a Pod can connect to the same volume.
- A Pod is the smallest deployment unit within a cluster and runs within a specific Namespace.
- Pods are fundamentally ephemeral.
The term "ephemeral" means that in Kubernetes, Pods are one-time resources used to maintain a running state and can be deleted at any time if needed. Keep this in mind. [[Service]] exists as a persistent resource.
Why are deployments grouped into Pod units? #
- Enhanced ease of use through IP and Port sharing between containers within a Pod.
Consider an application deployed with N containers mounted in a single Pod.
Containers within this application exchange data in real-time and update their states accordingly.
The two containers can communicate via localhost without needing separate IP calls.
Container #
A Pod is fundamentally composed of one or more containers.
Containers within a Pod have ports to allow services to connect to each other.
Here, one container can have multiple ports, but multiple containers cannot share a single port.
A Pod also generates a unique IP when created.
If you access a Pod via its IP, it's only accessible within the Kubernetes cluster, not from outside.
Label #
Labels are used not only for Pods but for all objects.
However, they are most frequently used with Pods.
Labels are used to categorize objects according to their purpose and to link objects together.
They are structured as key-value pairs.
Node Schedule #
A Pod must be scheduled onto one of several Nodes.
There are methods for manually selecting a Node and for Kubernetes to automatically select one.
The Kubernetes scheduler can choose a Node based on factors such as:
- CPU usage
- Memory usage
Pod Definition #
Let's define a single-container Pod (one container within the Pod), using Nginx as an example.
While it can be done with commands, this time I'll write it as a manifest. Create a YAML file.
apiVersion: v1
kind: Pod
metadata:
  name: nginx
  labels:
    app: nginx
spec:
  containers:
  - name: nginx-container
    image: nginx
apiVersion: Refers to the Kubernetes API version used for object creation. Note that the version varies slightly depending on the object type; Pods and Services usev1, while ReplicaSets and Deployments useapps/v1.metadata.labels: A pure key-value metadata area that does not affect Pod operation. You can assign any combination you want. In an environment with multiple Pods running, you can perform various operations (like redeployment) on specific Pods only.spec.containers: Defines the properties of the containers to be included in the actual Pod. You can think of it as similar to Docker Compose.
Below are the main commands. Review and memorize them (T_T).
# List Pods in the cluster (default namespace)
kubectl get pods

# List Pods in a specific namespace within the cluster
kubectl get pods -n <namespace>

# Detailed listing of Pods (including private IP, node info)
kubectl get pods -o wide

# Edit the nginx Pod
kubectl edit pod nginx

# Check detailed information of the nginx Pod
kubectl describe pod nginx

# Check logs of the container running inside the nginx Pod
kubectl logs nginx

# Connect to the nginx Pod's container and execute sh interactively
kubectl exec -it nginx -- /bin/sh

# Delete the nginx Pod
kubectl delete pod nginx
Namespaces are used to isolate various workload resources as needed within a single cluster. I'll delve into them more later.
To manage multi-container Pods, you define multiple containers in the containers section.
To create a Pod using a YAML file:
# Run a Pod from a YAML file (declarative method)
kubectl apply -f pod1.yaml

# Run a Pod from a YAML file (imperative method)
kubectl create -f pod1.yaml
As an additional tip, you can also save the basic skeleton of a YAML manifest to a file.
# Generate a Redis Pod manifest as a YAML file
kubectl run redis --image=redis --dry-run=client -o yaml > redis.yaml
For multi-container Pods, you must specify the container name when checking logs or connecting to a container.