Multi-Container Pod Design Patterns
What is a Multi-Container Pod? #
A multi-container pod is a pod where multiple containers run within a single pod.
These multiple containers share the same IP address and different ports.
Containers with different purposes or characteristics should not be placed together in a single pod.
This goes against Kubernetes' design philosophy.
Therefore, multi-container pods are best considered when you want to operate a main process alongside other containers that require close sharing of network or storage.
There are recommended design patterns for building such multi-container pods, and we will explore three of them.
Finally, we will also look into init pods.
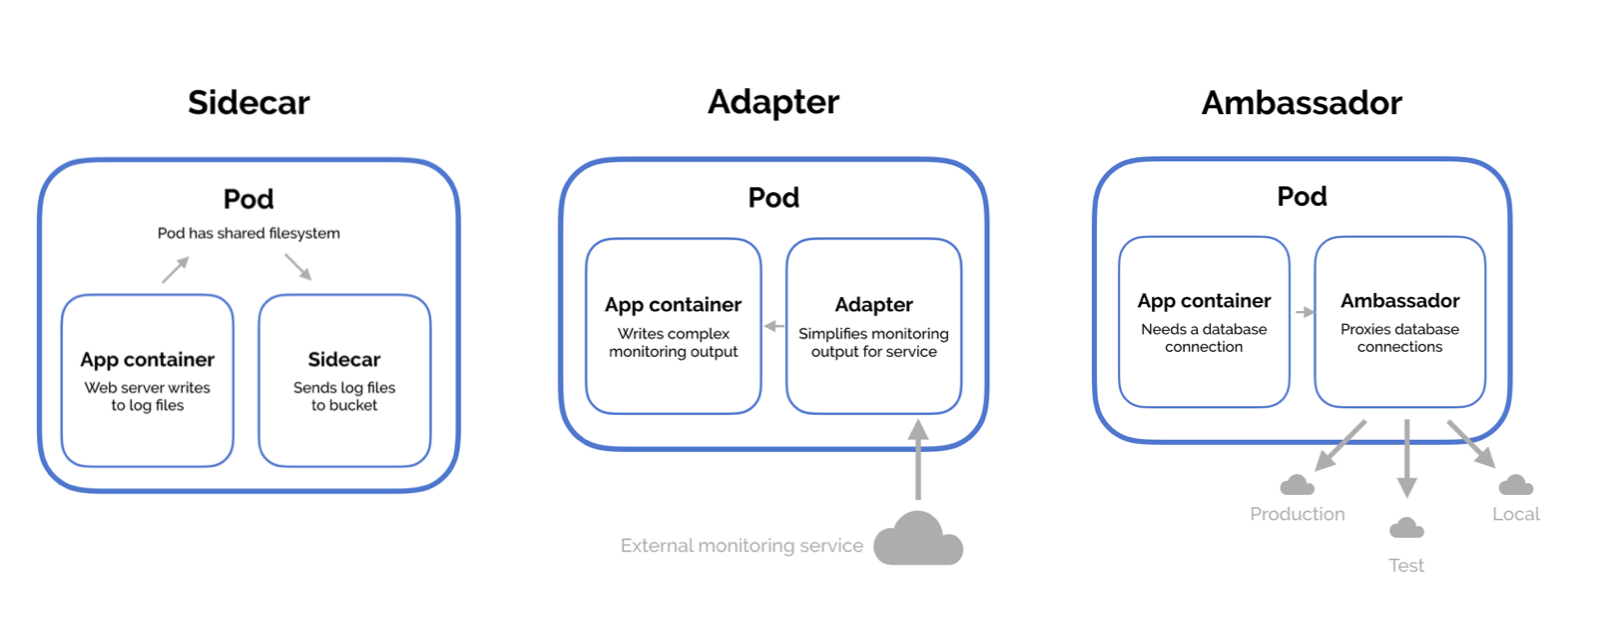
As shown above, there are three patterns. Let's examine them one by one.
Sidecar Container #
A sidecar container is a pattern where two different containers share the same file system to assist each other.
In fact, many pods are designed with sidecars.
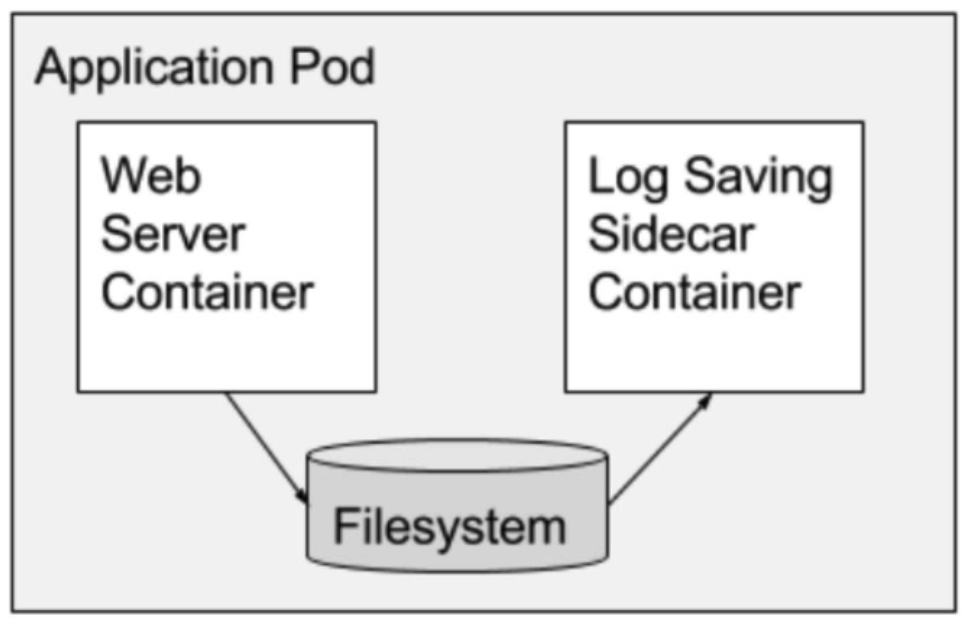
For example, this can be seen as two containers: Nginx and a container that collects Nginx logs.
- A separate sidecar container is placed within the pod to stream the latest Nginx logs.
- This container outputs Nginx logs to stdout or stderr.
- A separately operated logging backend (logging agent pod) or a separate log management service like logrotate then accesses these logs.
Let's look at the simplest form of implementation for the above example in YAML format below.
apiVersion: v1
kind: Pod
metadata:
  name: nginx-sidecar
spec:
  containers:
  - name: nginx
    image: nginx
    ports:
    - containerPort: 80
    volumeMounts:
    - name: logs
      mountPath: /var/log/nginx
  - name: sidecar-access
    image: busybox
    args: [/bin/sh, -c, 'tail -n+1 -f /var/log/nginx/access.log']
    volumeMounts:
    - name: logs
      mountPath: /var/log/nginx
  - name: sidecar-error
    image: busybox
    args: [/bin/sh, -c, 'tail -n+1 -f /var/log/nginx/error.log']
    volumeMounts:
    - name: logs
      mountPath: /var/log/nginx
  volumes:
  - name: logs
    emptyDir: {}
- An Nginx container is launched on port 80.
- Two additional
busyboxcontainers are launched. - These
busyboxcontainers function as sidecar containers, each streamingaccess.loganderror.logwritten to/var/log/nginx/bynginx. - The
tail -n+1 -fshell command is configured to provide streaming functionality. - These streamed logs can be viewed using the
kubectl logs nginx-sidecar [container-name]command. (metadata.name)
Adapter Container #
Adapter containers are primarily used to standardize the output format of a specific application deployed in a pod.
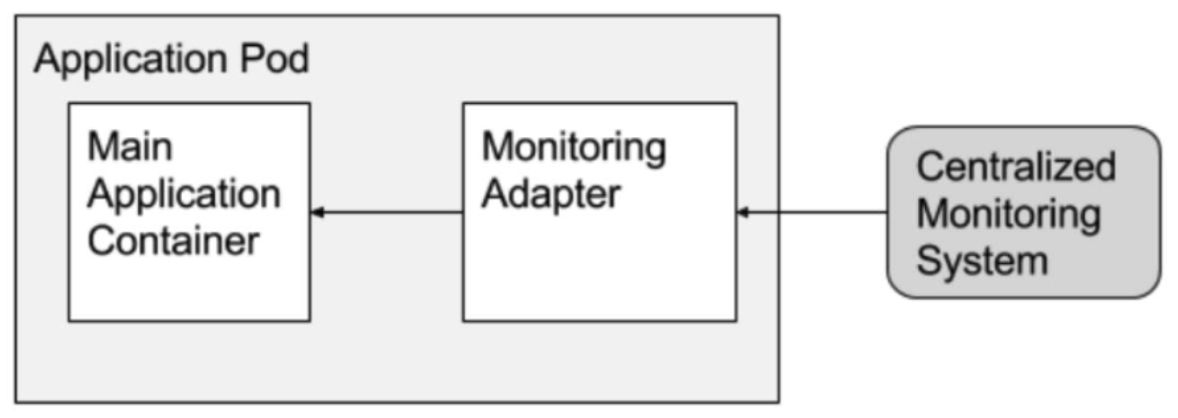
An example scenario can be seen with data formats.
When using various open-source tools, you might find that when retrieving dates, you get outputs in different formats, such as YYYY-MM-DD or DD/MM/YYYY, even though it's the same data.
Adapter containers are designed for the purpose of standardizing these output formats.
apiVersion: v1
kind: Pod
metadata:
  name: adapter-container-demo
spec:
  containers:
  - image: busybox
    command: ["/bin/sh"]
    args: ["-c", "while true; do echo $(date -u)'#This is log' >> /var/log/file.log; sleep 5;done"]
    name: main-container
    resources: {}
    volumeMounts:
    - name: var-logs
      mountPath: /var/log
  - image: bbachin1/adapter-node-server
    name: adapter-container
    imagePullPolicy: Always
    resources: {}
    ports:
      - containerPort: 3080
    volumeMounts:
    - name: var-logs
      mountPath: /var/log
  dnsPolicy: Default
  volumes:
  - name: var-logs
    emptyDir: {}
- The example above shows a main container running a
busyboximage outputting logs, which are then received bybbachin1/adapter-node-server, formatted into a JS file, and then outputted. - Transforming specific logs or outputs into a universal format is one of the primary uses of adapter containers.
Ambassador Container #
Ambassador containers are designed to simplify connections between a pod and external services.
They act as a proxy for external communication that the main container would otherwise have to perform, hence being called "Ambassador."
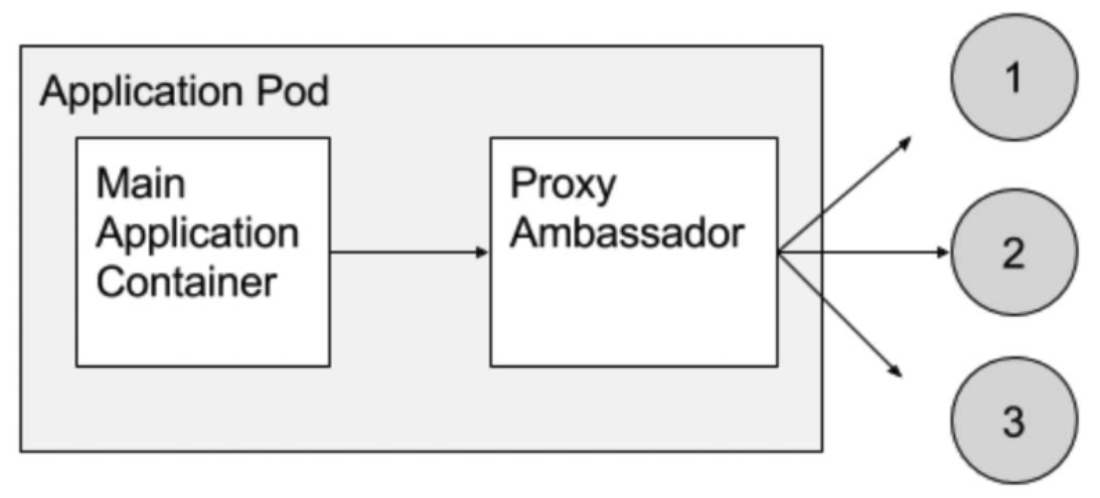
In this architecture, the main container can only communicate with external services through the ambassador.
Ultimately, it can be seen as a container that acts as a proxy for the main application container.
The example below, introduced in a technical blog by Magalix, implements a case where a redis server within a pod utilizes a proxy container to access external redis instances. More detailed explanations can be found in the original author's blog post.
The definition (YAML) of the entire pod including the ambassador container from that post is as follows:
apiVersion: v1
kind: Pod
metadata:
  name: ambassador-example
spec:
  containers:
  - name: redis-client
    image: redis
  - name: ambassador
    image: malexer/twemproxy
    env:
    - name: REDIS_SERVERS
      value: redis-st-0.redis-svc.default.svc.cluster.local:6379:1 redis-st-1.redis-svc.default.svc.cluster.local:6379:1
    ports:
    - containerPort: 6380
- The main process of the above pod is
redis-client, which is arediscontainer acting as a client. - The
ambassadorcontainer, acting as an ambassador, serves as a proxy and handles the connection between therediscontainer and the network locations namedREDIS_SERVERSusing port6380. - The locations named
REDIS_SERVERSrefer to theredis-st-0andredis-st-1pods that look to theredis-svcservice. Therefore, for the pod to operate normally according to the above configuration, the creation of aredis-svcservice along with a StatefulSet namedredis-stwould be additionally required. These resources will be covered in detail in the next article.
Init Container #
An init container performs initialization tasks before the main containers of a pod start running.
It sets up necessary environmental conditions before the main container's pod starts, and once completed, it allows the main container's process to begin.
- All init containers must terminate once their work is complete.
- Because init containers must terminate, probes cannot be used (livenessProbe, readinessProbe, startupProbe).
- If multiple init containers are used, they will execute sequentially.
- If an init container's initialization task fails, kubelet periodically restarts that container. This option can be configured via
restartPolicyto specify how many times to restart; if set toNever, the init container will terminate in a Failure state if it fails.
apiVersion: v1
kind: Pod
metadata:
  name: myapp-pod
  labels:
    app: myapp
spec:
  containers:
  - name: myapp-container
    image: busybox:1.28
    command: ['sh', '-c', 'echo The app is running! && sleep 3600']
  initContainers:
  - name: init-myservice
    image: busybox:1.28
    command: ['sh', '-c', "until nslookup myservice.$(cat /var/run/secrets/kubernetes.io/serviceaccount/namespace).svc.cluster.local; do echo waiting for myservice; sleep 2; done"]
  - name: init-mydb
    image: busybox:1.28
    command: ['sh', '-c', "until nslookup mydb.$(cat /var/run/secrets/kubernetes.io/serviceaccount/namespace).svc.cluster.local; do echo waiting for mydb; sleep 2; done"]
In the example above, two init containers, init-myservice and init-mydb, are declared.
Their role is to output logs every 2 seconds until myservice and mydb are found.
After deploying this pod, if you check its status with kubectl get, it will appear as follows:
NAME        READY     STATUS     RESTARTS   AGE
myapp-pod   0/1       Init:0/2   0          2m
READY is 0/1, meaning the container has not yet been launched.
STATUS indicates that neither of the two init containers has terminated yet.
Now, to satisfy the conditions of the init containers defined in the YAML,
deploy the following services using the kubectl apply -f command.
apiVersion: v1
kind: Service
metadata:
  name: myservice
spec:
  ports:
  - protocol: TCP
    port: 80
    targetPort: 9376
---
apiVersion: v1
kind: Service
metadata:
  name: mydb
spec:
  ports:
  - protocol: TCP
    port: 80
    targetPort: 9377
After confirming the deployment status of the services, let's recheck the status information of the myapp-pod we looked at earlier. You will see that the READY and STATUS fields have changed, indicating normal operation.
NAME        READY     STATUS    RESTARTS   AGE
myapp-pod   1/1       Running   0          5m
Note that once a pod is in the Running state, it will remain in that state even if the initialization conditions change later.