Building Container Applications
Creating a MySQL Container #
It is best to run only one application per container.
This time, I will launch a MySQL container.
$ sudo docker run -d --name wordpressdb -e
MYSQL_ROOT_PASSWORD=password
MYSQL_DATABASE=wordpress
mysql:5.7
-d option #
Previously, we could connect to and interact with containers using the -it option.
However, since MySQL runs mysqld which occupies a single terminal, interaction is not possible even with the -it option.
Instead, you can only see the execution logs.
Therefore, the -d option is used to make the container run in the background. If you use -d instead of -it with an Ubuntu container, the container will not start because there is no foreground program occupying a terminal inside it.
That doesn't mean there's no way to access the MySQL container. You can use $ sudo docker exec -it wordpress /bin/bash to run and use a bash shell process.
-e option #
This option sets environment variables inside the container. After connecting to the container, you can check with env to confirm they are set correctly.
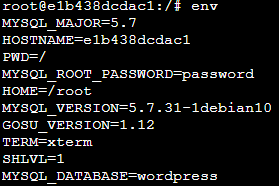
Additionally, let's check if the password I entered is correctly applied using mysql -u root -p.
Creating a WordPress Container #
Next, I will create a WordPress container.
$ docker run -d
-e WORDPRESS_DB_PASSWORD=password
--name wordpress
--link wordpressdb:mysql
-p 80
wordpress
--link option #
This time, the --link option stands out. The --link option allows access to a container alias without needing to know its internal IP.
The reason for this is that internal IPs are reallocated every time a container starts, so they can change at any time.
Now, from within WordPress, you can access wordpressdb using the hostname mysql.
However, it is recommended to use Docker bridge networks instead of this method.
Additionally, I specified -p 80 without an external port, and Docker automatically assigns one.
